
Aligning your fence for success involves precise measurements and post placement using a string line to ensure uniformity. Secure the posts with concrete for stability, maintaining a level structure throughout the installation.
1. Gathering Tools for a Successful Fence Alignment
Starting a fence installation project requires careful planning and the right set of tools to ensure efficiency and safety. Securely aligning your fence begins with gathering essential equipment designed to make the job smoother and more effective. Here’s a focused look at the necessary tools and materials, emphasizing why each is vital for your fencing project.
When selecting tools, prioritize those that offer maximum efficiency and ease of use. Diggers and post drivers are paramount for setting the foundation of your fence. For instance, a manual digger or a powered post driver like the REDI Driver Commercial/DOT ensures posts are set firmly and evenly in the ground, a key step for a stable and aligned fence.
Once posts are in place, the next step involves the proper stretching and securing of the fencing material. Tools like the Easy Twist Tool and Bear Hold Chain Link Fence Stretcher allow for the precise adjustment and positioning of wire, ensuring that the fencing is taut and secure from one post to the next. This enhances the fence’s appearance and functional integrity, preventing sagging and gaps.
Safety gear is equally as important as the mechanical tools. Protective gloves, goggles, and sturdy footwear are necessary to protect against potential injuries from flying debris, especially when cutting wires or driving posts. High-quality wire cutters and bolt cutters, such as the Knipex Wire Cutter and Nippitz V10 Super Power Toolguy Compact Bolt Cutter, offer clean and precise cuts, reducing the risk of jagged edges that can lead to equipment damage or personal injury.
For those who require alignment aids, the 1/8 Polyester String Line – Neon Orange is invaluable. This tool assists in maintaining a straight line during installation, ensuring that every section aligns perfectly with the next, which is critical for both aesthetics and structural integrity.
Investing in high-caliber, lasting tools pays off in the long run. Durable tools like the Magnum 15-Degree Coil Nail Gun for fastening and various types of stretchers and tensioners ensure you can reuse your tools for future projects without loss of quality or effectiveness. Choosing tools that fit your specific type of fencing material, whether wood, vinyl, or metal, helps tailor the installation process to your needs, enhancing the overall success of the project.
Preparing with the correct tools and safety equipment sets the stage for a successful fence installation, ensuring the final product is visually pleasing, structurally sound, and secure. This foundation of strong, well-aligned posts and tightly fitted materials will protect and enhance your property for years to come. For wood fence solutions, consider using Greenes Picket Fence 16″ X 12′ White Bulk for a durable and attractive boundary.
By starting your project with comprehensive preparation and the best tools available, you position yourself for success, guaranteeing a fence that meets both your aesthetic and practical requirements. Keep these tips in mind as you plan and execute your fence installation, and enjoy the lasting benefits of a well-constructed fence.

2. Planning Your Fence Layout for Optimal Success
Effective fence planning is paramount to achieving both practical functions and aesthetic appeal for your property. Whether aiming for privacy, securing property boundaries, or enhancing curb appeal, a well-planned fence layout can make all the difference. Below are essential steps and considerations for creating an optimal fence layout.
Understand the Purpose and Legal Requirements
Start by pinpointing the primary function of your fence. Whether it’s for privacy, security, or decorative purposes, understanding this guides your choice of materials and design. For instance, a fence intended for security might be best built with metal to provide strength without blocking sightlines, whereas a privacy fence would be better suited to solid, taller structures.
Being well-informed about local zoning laws, building codes, and homeowners’ association regulations is equally vital, as these may affect your fencing choices. These regulations often specify allowable fence heights, materials, and placement. Checking with your local building department to confirm necessary permits before construction begins is critical to avoid legal complications.
Selecting Materials and Measuring Your Space
Choosing the right materials is pivotal. Wood offers a traditional appeal but requires regular maintenance due to its susceptibility to weather conditions. Vinyl provides a low-maintenance alternative with longevity, while composite materials afford the appearance of wood but necessitate less upkeep. For a budget-friendly option, chain link fences are secure and durable, though they might lack aesthetic qualities.
Proper measurements are crucial for successful fence installation. This involves not only the total perimeter but also accurate placement of gates and strategic considerations for uneven terrain. A stepped approach may be suitable for a sloped site, allowing the fence to follow the land’s contour.
Planning and Execution
Creating a detailed sketch of your fence layout is imperative. This should include the positioning of each post and the gates, particularly noting any special features such as slopes or obstacles like trees and large rocks. Engaging a skilled contractor can be beneficial during this phase, helping with everything from design to obtaining permits, ensuring a seamless process.
Proper planning extends to the financial aspect of fencing. Investing in durable materials might have a higher upfront cost, but it reduces long-term maintenance expenses. Assess your budget realistically, including potential future expenses for upkeep or repairs. Materials like the Greenes Picket Fence might be an excellent choice for those looking for a balance of charm and simplicity.
Conclusion
Meticulously planning your fence layout and considering all necessary factors from functionality and legal requirements to aesthetic preferences and maintenance can enhance the efficiency and appearance of your home. The key to a successful fencing project lies in thorough preparation, sound choices of materials, and precise implementation, ensuring your fence meets your needs and adds value and charm to your property.
3. Techniques for Digging Post Holes Effectively
Preparing your fence begins with accurately digging post holes, which is foundational for a stable and aligned fence. Here is a methodical approach to ensure every post sustains the structure effectively:
Planning and Layout: Before any digging occurs, meticulous planning on graph paper is necessary. Mark where each post and gate will be situated, confirm local building codes, and call 811 to mark any underground utilities. Use batter boards at the corners of your layout to allow easy adjustments to the string lines that determine the edge of each post.
Starting Point and Measuring: Initiate your layout from a fixed point, such as a corner of your house. Place a batter board into the soil and attach a mason’s string to visualize where the posts will align. Adjust strings to account for whether pickets or panels will attach on the inside or outside of the posts. Ensuring full panels fit between established posts is essential, avoiding any section narrower than 2 feet. The layout needs to be perfectly square, verifiable using the 3-4-5 triangle method at every corner.
Post Placement and Hole Preparation: Drive stakes into the ground, tightly against the string at points where posts will stand. Spacing should typically be between 5 and 8 feet apart, depending on the fence type. For precise alignment, mark the center of the first post hole, ensuring it is set back half the post width from the string, then remove layout strings. Each hole should be three times the post width, and the depth should surpass the frost line, typically around 24 to 30 inches, to prevent frost heave.
Digging the Holes: Begin digging with a post hole digger or auger, suitable for cutting through roots and loosening soil. For panel fences, it’s advisable to dig the first three holes, then install posts and panels to ensure alignment before proceeding with more holes. For component-built fences, continue digging as planned, ensuring that post distances align with the rail lengths.
Setting Posts in Place: Once holes are dug, position the posts atop a 6-inch base of ¾-inch crushed stone to aid in drainage. Fill around each post with the soil excavated from the holes, ensuring to pack it down firmly every 6 inches. In sandy soil, integrate gravel with the soil to enhance stability; in clay-rich soils, gravel around the posts provides better drainage.
Concrete Use: For high-stability needs such as gateposts or when rock soil layers interfere with digging, use a concrete footing. Prepare and pour carefully to keep posts vertical while setting. Remember that concrete is an extra expense and will need posts to be braced until it hardens.
These steps will significantly help in laying a durable and well-aligned wooden fence, enhancing both the aesthetic and functionality of your space. For long fence projects, consider renting a power auger to save time and reduce physical strain.

4. Aligning and Installing Your Fence Posts
Setting up a wooden fence that lasts for years and withstands the elements starts with the proper installation of fence posts. The following guide provides straightforward steps to get your fence up and standing strong.
Before starting, understand the local building codes and secure necessary permits. Check for underground utility lines to avoid disruptions or accidents during digging.
Step 1: Prepare the Ground
Outline your fence area using batter boards and string, marking precise locations for each post. Stake each marked spot to ensure accuracy during post installation.
Step 2: Choose the Right Materials
Selecting high-quality fence posts, such as heartwood or pressure-treated wood, is fundamental. Optionally, treating the bottom of posts with a wood preservative extends their life, especially in damp climates.
Step 3: Digging the Holes
For each post, dig a hole that is one-third the height of the post and about three times its width. These dimensions are critical for stability. For improved drainage, which prevents water from pooling and rotting the wood, add a base of 4-6 inches of crushed stone.
Step 4: Setting the Posts
With posts in place, use braces made from stakes and scrap lumber to keep them upright and straight. Ensuring posts are perfectly level is important for the overall alignment of your fence.
Step 5: Concrete for Endurance
Prepare a concrete mixture with a paste-like consistency and fill the holes around each post, leaving the concrete slightly mounded to guide water away. This solidifies the posts’ base and significantly increases the fence’s resilience against winds and weight.
Step 6: Final Adjustments and Sealing
After filling holes with concrete, leave at least 3 days for it to fully cure. During this period, ensure posts remain straight and make any necessary adjustments. Seal gaps between posts and concrete with a suitable sealant to minimize water ingress and prevent rotting at the base.
Continuing Care
Maintaining your fence requires regular checks, especially after extreme weather, to tighten any loosened posts and reseal as needed. Periodic maintenance, including wood treatment and being attentive to damages, can significantly extend your fence’s life.
By adhering to these steps, your wooden fence will be better aligned, more durable, and functional. This provides peace of mind along with aesthetic appeal. For extensive projects, consider the efficiency of renting power tools or hiring professional help to ensure your fencing meets both expectations and regulatory standards.
For homeowners looking to enhance their garden’s natural tones, consider integrating the Greenes Picket Fence for a charming and effective boundary.
These steps will ensure your wooden fence serves well in form and function, securing your property and enhancing its overall aesthetics.

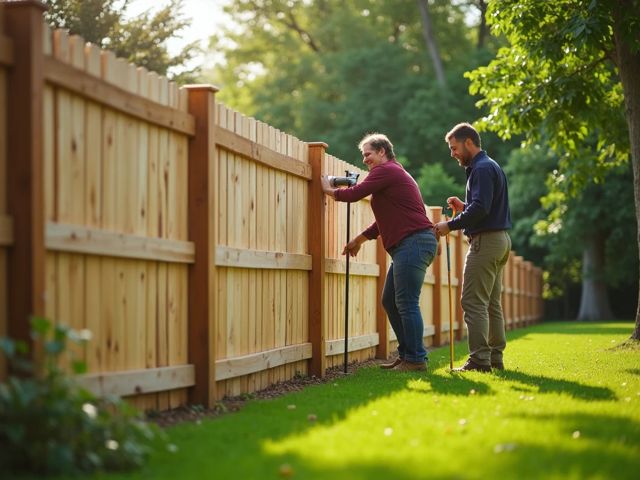
5. Finalizing Your Fence Alignment with Panel Installation
For those eager to finalize their fence installation, attaching fence panels properly to posts ensures they are level, securely fastened, and well-aligned for a polished appearance. This section highlights these steps with practical advice to get your fence looking just right.
Start by measuring the spacing between your fence posts accurately. Each post should ideally be spaced as wide apart as your fence panels, ensuring uniformity across the span of your fence. Stability is key, so embedding posts at least 18 inches deep into the ground and securing them with concrete or gravel will offer the necessary support. Let the posts set for at least 24 hours before attaching any panels.
When setting the fence height, use a tight string line between end or corner posts. This ensures a consistent height across all points, marking the line on the posts and adjusting for flat or sloping terrains as necessary, cutting on marked flat terrains or adjusting for step installations on slopes.
For panel installation, align your top support rail with the posts’ tops. Employ horizontal support rails as guides to keep succeeding panels straight and uniform. Secure each panel with appropriate fasteners—typically four-inch wood screws are adequate—to firmly hold the panel in place.
Precision is crucial when ensuring that each panel aligns with neighboring panels and maintains aesthetic continuity. Use a spirit level to check that each panel is horizontally level and that the posts themselves are plumb vertically.
Double-check the alignment as you go, adjusting any discrepancies before finalizing the installation. Once all panels are attached and aligned, trim any excess length from the posts using a saw for a clean, uniform finish.
A well-installed fence enhances your property’s safety and visual appeal. Ensure your materials are up to the task by choosing high-quality options such as those provided by Greenes Picket Fence, offering durability and style.
Attention to these guidelines during panel installation will ensure your fence stands solidly and looks impeccable, reflecting well on the effort and care invested in its construction. Use appropriate tools and consult with professionals if unsure of any step. With the right approach, your fence will look great and last for years to come.

FAQ
What tools are essential for a successful fence alignment?
Gathering the right tools is vital for a successful fence alignment. Key tools include diggers, post drivers, the Easy Twist Tool, and Bear Hold Chain Link Fence Stretcher for precise adjustments. Safety gear like gloves, goggles, and sturdy footwear protects against injuries. High-quality wire and bolt cutters ensure clean cuts. An alignment aid like a Neon Orange Polyester String Line helps maintain a straight line during installation.
How do I plan my fence layout effectively?
Effective planning involves understanding the purpose of your fence (privacy, security, or decorative) and knowing local zoning laws and building codes. Choosing the right materials is crucial, along with accurate measurements of your space for gates and terrain irregularities. Creating a detailed sketch that includes post positions and special features aids in proper execution.
What is the correct method for digging post holes?
Accurately digging post holes begins with planning and layout. Use a fixed starting point and a mason’s string to visualize post alignments. Holes should be spaced 5 to 8 feet apart, be three times the post width, and exceed the frost line depth. Using tools like a post hole digger or auger is recommended to ensure holes are the right depth and width for stability.
How should I install and align my fence posts?
Start by marking your fence area with batter boards and string to outline post locations. Use high-quality materials for the posts and dig holes that are one-third the post height and three times its width. Set posts upright with braces, then use concrete for added stability if needed. Make necessary adjustments while the concrete cures to ensure posts stay straight.
What steps are involved in attaching fence panels to posts?
For attaching fence panels, measure the spacing between your posts for uniformity and stability. Use a tight string line to maintain consistent height across all panels. Align each panel with support rails for straightness, securing them with appropriate fasteners. Check alignment frequently during installation and trim excess post length for a clean finish.
How can I ensure the longevity and upkeep of my fence?
Regular checks are essential for maintaining your fence’s integrity. Inspect after extreme weather events, tightening any loose posts and resealing as needed. Periodic maintenance, including wood treatment and being attentive to damages, can significantly extend your fence’s life.