
Secure necessary permits, plan your fence line, prepare the layout, dig post holes, install rails and pickets, and apply finishing touches. Regular maintenance extends the fence’s lifespan.
1. Gather Necessary Permits and Check Local Codes
Before embarking on your wood fence installation, it’s crucial to secure any required permits and familiarize yourself with local building codes to avoid potential legal issues. In California, for instance, installing a fence involves adhering to local codes and, in many cases, obtaining a permit. The need for a permit generally depends on factors such as property location, the fence’s height, and its placement inside or outside highly populated areas.
In areas like Los Angeles, it’s often necessary to consult with the Los Angeles Department of Building and Safety (LADBS) to confirm the specific permit requirements before construction begins. While rural locales might not require a permit for fences under six feet, denser regions frequently do.
To safeguard against future disputes, understanding and complying with regulations, such as the California Good Neighbor Fence Law, is essential. This law includes notifying neighbors and setting up cost-sharing agreements for shared fences. Furthermore, checking for local homeowners’ association rules and underground utility placements can ensure a smoother installation process.
Certain types of fencing, like masonry or chain link, might necessitate a Wall and Fences Permit, which involves submitting plans for review by the county. This check ensures compliance with both California Building Codes and local development codes. Engaging with this process online through designated portals simplifies obtaining the necessary clearance.
To sum up, confirming whether your specific project requires a permit helps maintain property value and ensures thorough safety compliance. Understanding these legal frameworks will not only protect your investment but also foster a harmonious neighborhood environment.

2. Plan Your Fence Line and Design
Mapping out your fence line and design ensures a smooth installation process and avoids potential issues. Start by marking your property boundaries to avoid encroaching onto neighboring land and consult your property survey. Decide the function of your fence, whether for privacy, security, or containment. This will guide your choice of materials, considering maintenance and cost.
Verify codes and neighborhood rules as they may dictate the height and materials for your fence. Plan the location of any gates to enhance accessibility, ensuring easy entry and exit. Strategically place gates to prevent muddy entryways on higher grounds.
Use graph paper to visualize gate placements, slopes, and fence length. Calculate the total linear footage required, exploring bulk-buying options if you’re using wood. Engage with your neighbors about your plans, especially if your project affects shared property lines, ensuring a functional, aesthetically pleasing fence that complies legally and enriches your home’s appeal.
3. Prepare the Fence Layout
Mapping out the fence layout is essential in building a wooden fence. Start by laying out the perimeter using batter boards and string lines to maintain straight lines and square corners. Verify your property lines to prevent disputes with neighbors.
Consider the topography of your area, choosing a racked fence for gentle slopes or a stepped fence for steeper gradients. Mark post locations with stakes to ensure even spacing and accurate placement.
Communicating with neighbors about your building plans, especially along property lines, can prevent conflicts and potentially lead to shared costs. Prioritizing these preparation steps can make the installation smoother and the final outcome visually appealing.

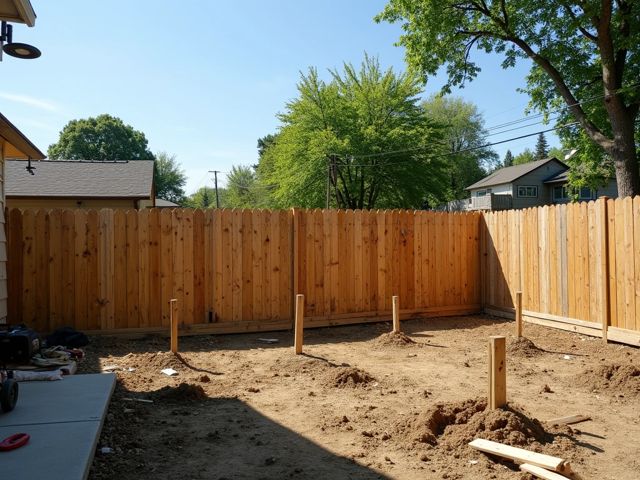
4. Dig Post Holes and Set Fence Posts
Installing fence posts securely ensures a durable and stable wood fence. Mark utility lines before digging, and use a posthole digger or auger to create holes about 2 feet deep for typical 6 to 8-foot fences. Space your post holes 6 to 8 feet apart.
For stability, setting posts in concrete can be beneficial. Use a gravel base, center each post, and surround it with a dry concrete mix, following up with water. The posts must remain upright with bracing until the concrete cures. Adding concrete, especially for gate-support posts or in rocky areas, enhances stability.
After curing, cover the concrete with soil or additional molding for better drainage. This ensures a firm, charming boundary to your yard.

5. Install Rails and Pickets
Securing the rails and pickets is crucial in building a reliable wood fence. Attach horizontal rails, called stringers, for core support. A six-foot fence typically needs three rails. Position the bottom rail six inches above the ground to simplify maintenance and reduce moisture. Align rails with the slope of your yard or use a stepped style as necessary.
For picket installation, start from a corner or gatepost, keeping uniform gaps with spacers. Predrilling screw holes prevents splitting, and a third rail provides extra support for taller fences. Select pickets that match your home’s aesthetic while offering privacy and security.

6. Apply Finishing Touches and Maintenance
Maintain your wood fence by attaching post caps to protect against weather damage. Apply a protective stain or treatment, especially at the posts’ base, once pressure-treated wood has dried. Regular maintenance extends your fence’s life; inspect annually for loose nails or damaged boards, and clean it every two to three years.
Use a pressure washer or brush to clean, followed by a UV-protective stain. Trim vegetation to prevent moisture buildup, maintaining your fence’s finish. By following these care practices, your wood fence will remain a lasting, elegant feature of your home, enhancing its appeal against time and elements.

FAQ
What permits do I need before installing a wood fence?
Before installing a wood fence, ensure you secure the required permits and check building codes to avoid legal issues. Permit necessity varies based on location, fence height, and placement.
How should I plan my fence line and design?
Begin by marking property boundaries and decide your fence’s function, like privacy or security, to guide material choice. Verify codes for restrictions on height and materials. Plan gate locations for access and map out the design to calculate material needs.
What should I consider when preparing my fence layout?
Use batter boards and string lines to ensure square corners and straight lines. Verify property lines, and mark post locations with stakes for alignment. Communicate with neighbors to avoid conflicts, especially along property lines.
How do I properly set fence posts?
Before digging, mark utility lines. Dig holes roughly 2 feet deep and space them 6 to 8 feet apart. Use a gravel base for drainage, and set posts in concrete for stability. Ensure alignment with string guides, and brace posts until concrete cures.
How do I install rails and pickets on a wood fence?
Secure horizontal rails for support, positioning them correctly for maintenance and moisture reduction. Begin installing pickets from a corner, keeping uniform gaps with spacers. Predrill holes to prevent splitting.
What maintenance is required for a wood fence?
Attach post caps, apply protective stain, and inspect regularly for maintenance, cleaning every two to three years. Trim vegetation to avoid moisture and maintain the fence’s finish, ensuring its integrity through consistent care practices.