
DIY wood fence gate projects allow you to save on labor costs and customize the gate to fit your style. By following the steps for planning, building, and installing, you can create a robust and visually appealing gate that adds value to your property.
Introduction to DIY Wood Fence Gate Projects
Wood fence gate projects are becoming a popular choice for those who enjoy DIY tasks. They allow for cost savings and customization to match your property’s aesthetic. By building your own wood fence gate, you also gain control over the materials and construction quality.
DIY wood fence gate projects offer several benefits:
- Cost Savings: Avoid labor costs by handling the construction yourself.
- Customization: Tailor the gate to your specific needs and style preferences.
- Satisfaction: Enjoy the fulfillment of completing a project with your own hands.
When starting a DIY wood fence gate project, it’s crucial to have the right materials and tools. Basic items you’ll need include:
- Miter saw and table saw
- Carpenter’s square
- Wood glue and gate hardware
The process typically involves:
- Planning the Layout: Measure and decide on the dimensions and style of the gate.
- Building the Frame: Create a sturdy rectangular frame using sideboards, top, and bottom rails.
- Adding Stability Braces: Insert diagonal braces within the frame to enhance structural integrity.
- Attaching the Pickets: Securely mount pickets to the frame for aesthetic appeal and added strength. Learn more about enhancing privacy with wood fences.
- Installing the Hardware: Attach hinges, latch, and other necessary hardware to ensure functionality.
Following these steps ensures that your wood fence gate is both robust and visually appealing. Investing time and patience in the construction process will result in a gate that is practical and enhances the appearance of your property.

Essential Tools and Materials
Creating a DIY wood fence gate involves gathering various tools and materials to ensure your project goes smoothly. Here’s a detailed list of essentials:
To start, you’ll need a collection of basic tools:
- Carpenter’s square: Ensures right angles for precise cuts.
- Hand saw or circular saw: Essential for cutting wood panels to size.
- Tape measure: Accurate measurements are critical.
- Spirit level: Keeps your gate aligned and level.
- Cordless drill: Necessary for drilling holes and driving screws.
- Hammer: Useful for securing nails and brackets.
- Post hole digger: Required if you’re installing new posts for your gate.
When it comes to materials, quality is key:
- Wood types: Choose durable options like cedar, redwood, or treated lumber.
- Screws: Use galvanized or stainless steel screws to resist rusting.
- Hinges: Heavy-duty gate hinges provide support and smooth operation.
- Latch systems: Ensure your gate stays securely closed with a sturdy latch or lock.
- Gravel or concrete: Needed for stabilizing fence posts.
- Wood sealant or paint: Protects the wood from weather damage and extends its life.
Combining the right tools and materials is essential for constructing a long-lasting, robust gate. Be sure to prepare all items before starting your project.
Step-by-Step Instructions
To start your wood fence gate project, gather the necessary tools and materials. Essential tools include a hammer, sawhorses, and a drill. Optional tools like a countersink bit and a speed square can make the job easier. You’ll need 2x4s, fence pickets, 4-inch and 1-5/8″ exterior wood screws, gate hinges, and a latch.
- Cut and Position Rails: Measure and cut two horizontal 2×4 rails to the required length. Position them parallel on a flat surface.
- Attach Diagonal Support: Cut a 2×4 for the diagonal brace. Screw it to the rails forming a “Z” shape, ensuring it runs from the bottom hinge side upward.
- Secure Initial Pickets: Attach the first two fence pickets to the hinge side using six screws per picket.
- Install Gate Hinges: Mark and predrill holes for the hinges on the gate. Attach the hinges using lag screws.
- Add Latch Support: Secure another 2×4 to support the gate latch on the latch side.
- Hang the Gate: Position and attach the gate to the fence post with lag screws, ensuring alignment and proper spacing.
- Attach Remaining Pickets: Secure the rest of the pickets to the gate. Use fewer screws initially for adjustability.
- Trim Gate Bottom: Cut the bottom of the gate for ground clearance if needed.
- Install Gate Latch: Place the gate latch about 2/3 of the way up from the bottom and attach it.
- Install Handle: Add a gate handle for ease of use.
Tips to Prevent Sagging:
- Install a diagonal brace from the bottom hinge upward.
- Use screws instead of nails for better long-term hold.
Recommendations for Wood:
- Choose Redwood or Cedar for durability and aesthetic appeal.
- Pressure-treated wood is advisable if the gate needs to be painted or if it will contact the ground.
By adhering to these steps and tips, you can build a durable and aesthetically pleasing wood fence gate that remains functional and sag-free for years. The estimated project takes 4-8 hours with costs ranging from $125-$160. Enjoy your new gate!

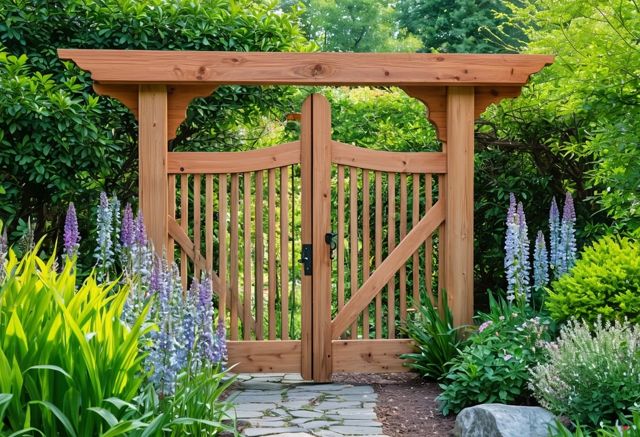
Design Ideas and Inspiration
When creating your wood fence gate, consider various designs and styles to match your aesthetic. Here are some popular design trends:
- Rustic Designs: These gates often use natural, weathered wood for an old-world charm. Featuring:
- Rough-hewn planks
- Traditional wrought iron accents
- Earthy color palettes
- Modern Designs: Sleek and minimalist, modern wooden gates typically employ clean lines and functional elements. Look for:
- Horizontal slats
- Smooth surfaces
- Integrated metal elements
- Ornamental Designs: Add a touch of elegance with intricate patterns and artistic touches. Ideal components include:
- Carved wood panels
- Decorative hinges and latches
- Curved tops or intricate latticework
Inspiration can be drawn from these styles to create a gate that not only secures your property but also enhances its visual appeal. For high-quality materials and expert craftsmanship, consider Pickets for your fencing needs. Explore top wood fence styles for 2024 for more design ideas.

FAQ
What are the benefits of DIY wood fence gate projects?
DIY wood fence gate projects offer several benefits, including cost savings, the ability to customize the gate to your specific needs and style preferences, and the satisfaction of completing a project with your own hands.
What materials and tools are essential for a DIY wood fence gate project?
Essential tools include a miter saw, table saw, carpenter’s square, wood glue, and gate hardware. Additionally, you may need a hand saw or circular saw, tape measure, spirit level, cordless drill, hammer, and post hole digger. Important materials are durable wood types like cedar, redwood, or treated lumber, galvanized or stainless steel screws, heavy-duty gate hinges, latch systems, gravel or concrete for post stabilization, and wood sealant or paint.
What are the basic steps to build a wood fence gate?
- Plan the layout by measuring and deciding on the dimensions and style.
- Build a sturdy rectangular frame using sideboards, top, and bottom rails.
- Insert diagonal braces within the frame for stability.
- Securely attach pickets to the frame for added strength and aesthetic appeal.
- Attach hinges, latch, and other necessary hardware to ensure functionality.
How can I prevent my wood fence gate from sagging?
To prevent sagging, install a diagonal brace from the bottom hinge upward and use screws instead of nails for better long-term hold.
What type of wood should I use for my gate?
Redwood or cedar is recommended for their durability and aesthetic appeal. Pressure-treated wood is advisable if the gate needs to be painted or if it will contact the ground.
How long does it typically take to complete a DIY wood fence gate project?
The project typically takes 4-8 hours to complete.
What is the estimated cost of building a DIY wood fence gate?
The cost ranges from $125 to $160, depending on the materials you choose.
What design ideas are popular for wood fence gates?
Popular design trends include rustic designs using weathered wood and wrought iron accents, modern designs with horizontal slats and integrated metal elements, and ornamental designs featuring carved wood panels and decorative hinges.
How do I ensure my gate is level during installation?
Use a spirit level to keep your gate aligned and ensure that all measurements are precise before attaching the gate to the fence posts.