
To install a wooden garden trellis, prepare the wood by cutting it to the desired dimensions and assembling it with wood glue and screws. Secure the trellis in a suitable spot, either in a pot, directly in the ground, or against a wall.
Introduction to Wooden Garden Trellis
Building a wooden garden trellis adds both beauty and functionality to your outdoor space. It’s a project that supports climbing plants while creating a stunning focal point in your garden. Whether you’re an experienced woodworker or a beginner, this guide provides the essential steps to successfully construct your own wooden trellis.
Understanding the Design
- Design Variety:
- Trellises can come in different styles—lattice, fan, or obelisk—each offering unique visual appeal.
- Key Components:
- Vertical supports
- Horizontal supports
- Cross beams
- Sturdy framework ensuring stability
Choosing Materials
- Wood Selection: Opt for rot-resistant woods like:
- Cedar
- Redwood
- Essential Tools:
- Circular saw or handsaw
- Drill and screwdriver
- Wood screws and wood glue
- Clamps
- Tape measure and pencil
- Safety goggles and work gloves
Planning Your Trellis
- Determine Size and Shape:
- Measure the intended area for the trellis.
- Consider the plants you want to support in your design.
- Blueprint Creation: Drawing a blueprint can aid in visualizing your final product and checking off necessary materials.
Building Instructions
- Prepare the Wood:
- Cut your wood to the desired dimensions and sand the edges for a smooth finish.
- Assemble the Trellis:
- Lay the pieces out and ensure everything fits as planned.
- Use wood glue and screws to attach the vertical and horizontal supports. Ensure the structure is square for stability.
- Positioning the Trellis:
- Choose a suitable spot—either a wall, in a pot, or directly into the ground.
- If heavy plants will be supported, consider securing the structure with concrete for added stability.
Customization Options
- Finishing Touches: Paint or stain your trellis not just for protection but also to complement your garden’s color scheme. For more ideas on how to enhance your garden, see Creative Fence Painting Tips.
- Decorative Elements: Consider enhancing your trellis with additional features like hanging plants or decorative sculptures.
By following these steps, you’ll create a functional and attractive wooden garden trellis that enhances your outdoor area and the health of your climbing plants. Each trellis tells a story, from its design to the plants climbing it—let yours be a beautiful addition to your garden.
Benefits of Using a Wooden Garden Trellis
Investing in a wooden garden trellis offers numerous benefits that can transform your gardening experience:
- Versatility: A garden trellis can be used in various settings, whether in a small home garden or a large vegetable garden. They fit seamlessly into different garden designs.
- Enhanced Vertical Gardening: Wooden trellises support climbing plants, allowing them to grow upwards. This maximizes space in smaller gardens and creates a lush vertical landscape. For more on maximizing your garden space, visit Top 5 Garden Fence Designs 2024.
- Improved Air Circulation: By lifting plants off the ground, trellises promote better air circulation. This helps reduce the risk of diseases, meaning healthier plants.
- Aesthetic Appeal: Wooden trellises add beauty and style to any garden. They can be designed in various shapes, such as lattice or grid, to complement your garden’s aesthetic.
- Privacy Screens: Large wooden trellis panels can create privacy screens. This can help you meet certain Homeowners Association guidelines regarding fencing, offering a solution without compromising style.
- Support for Various Plants: Wooden trellises are perfect for climbing vegetables like cucumbers and tomatoes, as well as flowering vines like clematis and jasmine. They allow these plants to thrive and be displayed elegantly.
- Windbreaks: A trellis can help shield your plants from harsh winds, offering protection and creating a microclimate within your garden.
- Organized Growth: A trellis helps organize and guide plant growth, making it easier for gardeners to manage their plants. This can lead to healthier, more productive crops.
Building a wooden garden trellis not only enhances the functional aspect of your garden but also adds a visual focal point, turning your outdoor space into a more inviting and vibrant environment.
Types of Wooden Garden Trellis
Wooden garden trellises are a popular choice for gardeners looking to enhance their space with both functionality and beauty. They come in various designs, styles, and sizes, allowing homeowners to find the perfect match for their garden aesthetics. Here are the main types of wooden garden trellises you can consider:
- Classic Lattice Trellis:
- Offers a simple and elegant design.
- Ideal for flowering vines like clematis and climbing roses.
- A-Frame Trellis:
- Nods to traditional design while being effective for vegetable support.
- Best for climbing beans, peas, and cukes.
- Panel Trellis:
- Can be leaned against a wall or fence.
- Provides a stable structure for various climbing plants.
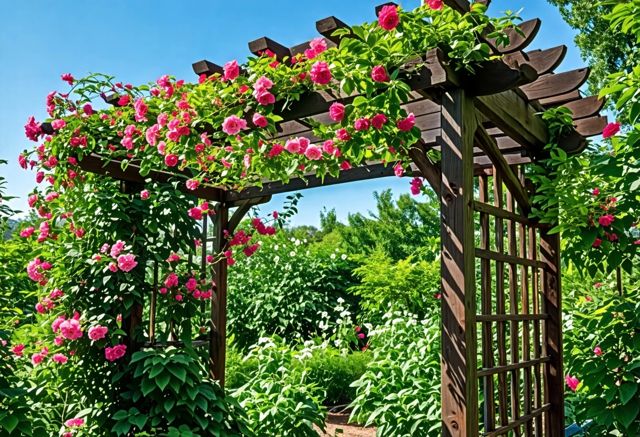
- Trellis Arches:
- Decorative and functional, creating a focal point in the garden.
- Great for supporting heavy climbers like wisteria and grapevines.
- Flat Vertical Trellis:
- Mounted against fences or walls for maximum space utilization.
- Simple design, often built from treated wood to withstand weather.
- Trellis Obelisks:
- Tall and narrow, adding vertical interest to flower beds.
- Ideal for small spaces while supporting heavy flowering plants.
Materials and Durability
When choosing a wooden garden trellis, the type of wood used greatly influences its durability and resistance to rot. Below is a list of common woods ranked from least to most rot-resistant:
|
Wood Type |
Rot Resistance |
|
Pine |
Low |
|
Cedar |
Moderate |
|
Redwood |
High |
|
Teak |
Very High |
For more insights on choosing the right wood, see Best Wood Types for Fencing.
DIY Trellis Ideas
You don’t have to purchase a ready-made trellis. Creative DIY options can be both economical and stylish. Here are a few ideas:
- Bamboo Trellis: Simple to construct using bamboo poles, perfect for vegetables.
- Repurposed Garden Tools: Old wooden tools can be converted into a unique trellis.
- Old Crib Rails: Can support climbing plants while adding a rustic touch.
Whether you want beauty, utility, or a combination of both, wooden garden trellises offer numerous options to choose from. With a bit of creativity, you can enhance your garden’s charm while providing the necessary support for your climbing plants.

Selecting the Right Wooden Garden Trellis
Building a wooden garden trellis can be a rewarding project that enhances both the beauty and functionality of your outdoor space. Selecting the right trellis involves considering both the materials and the design that best suits your garden and the plants you want to support. Here’s how to make the right choice for your garden:
- Consider the Purpose: A wooden trellis is not only a decorative feature but also a crucial support structure for climbing plants. It can set the stage for lush flowering vines, add vertical interest, and create a privacy screen or windbreak.
- Choose the Right Wood: The durability of your trellis largely hinges on the type of wood used. Here are some options:
|
Wood Type |
Resistance to Rot/Insects |
Best Use |
|
Cedar |
High |
Long-lasting support, minimal maintenance |
|
Redwood |
High |
Attractive look, sturdy for heavy climbers |
|
Pine/Spruce |
Moderate |
Require treatment for extended use |
- Design Variety: Different trellis designs have unique benefits. Some of the common styles include:
- Lattice: Ideal for lighter vines and a classic look.
- Fan: Great for limited spaces and can support various climbing plants.
- Obelisk: An eye-catching vertical structure suitable for showcasing plants.
- Sizing and Space: Assess the area where you plan to install the trellis. Factor in the height, width, and how much light the plants will receive. A detailed blueprint can help visualize the final outcome.
- Assembly Considerations: Prepare your wood properly before assembly. Sanding surfaces eliminates splinters, ensuring a smoother finish. Consider pre-staining wood to protect it from the elements.
- Maintenance Needs: Regular inspections are key to prolonging your trellis’s life. Check for signs of rot, cracks, or loose joints. Cleaning debris and applying wood treatments can keep it looking new. For more tips on maintaining your wooden structures, see Fence Maintenance Guide: Tips for Longevity and Beauty.
- Custom Options: Personalize your trellis with paint or stain to match your garden’s theme. You can even integrate other decorative elements, like hanging plants or sculptures, to enhance its overall appeal.
By carefully selecting materials, designs, and maintenance practices, your wooden garden trellis can become a stunning focal point that supports your favorite climbing plants for years to come.

Materials Needed for Installation
To successfully install a wooden garden trellis, having the right materials on hand is essential. This helps ensure a smooth building process and a sturdy, attractive finished product. Here’s a handy list of the materials you’ll need for your wooden trellis project:
Wood Selection
- Cedar: Naturally resistant to rot and insects, cedar is a great choice for long-lasting trellises. However, it can be on the pricier side.
- Redwood: Similar to cedar in durability, redwood also offers resistance to decay and is often more affordable.
Basic Tools
- Saw: For cutting the wood to the desired lengths.
- Drill: Needed for creating holes and securing screws.
- Screwdriver: For tightening screws to hold the structure together.
- Tape Measure: Essential for measuring your space and wooden pieces accurately.
- Pencil: Used for marking measurements on the wood.
- Clamps: Helpful for holding pieces together while the glue dries.
Fasteners and Adhesives
- Wood Screws: To secure the various components of the trellis.
- Wood Glue: Provides extra support in addition to screws, especially during assembly.
Safety Gear
- Safety Goggles: Protects your eyes while cutting and drilling.
- Work Gloves: Keeps your hands safe while handling materials.
Additional Materials
- Concrete: Optional, but recommended for securing the base of your trellis, particularly for heavier plants.
- Gravel: To improve drainage at the base if you’re setting the trellis in the ground.
- Trellis Brackets: If mounting your trellis to a wall or fence, these will provide added support.
By gathering these materials before you start, you set yourself up for success in creating a beautiful wooden garden trellis that supports your climbing plants and enhances your garden’s appearance. For more ideas on selecting the right wood for your garden projects, visit Choosing the Right Wood. Happy building!

Step-by-Step Installation Guide
To install a wooden garden trellis, follow this step-by-step guide, ensuring you create a beautiful and functional feature for your garden.
- Choose the Proper Location
- Select a spot that aligns with the trellis’s intended purpose.
- Look for a wall near your house or a garden area where you can enhance the outdoor space.
- Ensure the location allows for convenience during installation and future maintenance.
- Choose the Right Trellis
- Consider size, design, and material to match your garden’s aesthetic.
- Ensure it is large enough to effectively support your climbing plants without overwhelming the space.
- Secure the Trellis with Concrete (Optional)
- For enhanced stability, especially with heavy plants, you can secure the base with concrete.
- This step provides a sturdy foundation, allowing the trellis to handle weight and resist shifting.
- Install the Trellis in a Pot or In-ground
- Depending on the plants you are supporting:
- For lightweight plants, sink the trellis legs about 12 inches into the soil.
- For heavier plants, secure the trellis at least 2 feet deep, considering concrete support if necessary.
- Mount the Trellis to a Wall or Fence
- Use trellis brackets for secure attachment, allowing for good air circulation around the plants.
- This method facilitates healthy growth and prevents plants from suffocating against the wall.
- Choose an Adequate Trellis Wall Gap
- Leave enough space between the wall and the trellis.
- This gap is crucial for airflow and ensures healthy growth of your climbing plants.
Maintenance Tips
- Treat your wood trellis with a plant-safe solution to prevent decay and insect damage.
- Regularly check for wear and tear, cleaning off debris to keep it looking its best.
By following these steps, you’ll successfully install a wooden garden trellis that not only provides essential support for your plants but also enriches the charm of your outdoor space.
Maintenance Tips for Your Wooden Garden Trellis
To keep your wooden garden trellis in great shape and ensure it continues to provide the support your climbing plants need, regular maintenance is essential. Here are some essential tips to help you care for your trellis:
- Inspect Regularly:
- Check for loose screws, signs of rot, or weak sections at least once a year.
- Press on suspect areas to test the integrity of the structure.
- Repair Damage Promptly:
- If you find broken parts, replace or repair them quickly to prevent further deterioration.
- For splintered wood, use new pieces cut to size and secure them with screws or nails.
- Treat Wood for Longevity:
- Apply a wood preservative every few years to prevent rot and decay, especially in moist environments.
- Consider painting or staining to add a layer of protection against the elements.
- Manage Plant Growth:
- Regularly trim your climbing plants to prevent them from overburdening the trellis.
- Guide vines through the trellis carefully, using soft ties to avoid damaging the plants.
- Seasonal Clean-Up:
- Clear dirt and debris that can accumulate on the trellis, which may harbor pests or promote rot.
- Remove any weeds or plants that may be crowding the base or damaging the structure.
- Secure Firmly:
- Ensure that your trellis is firmly anchored to the ground or structure to withstand wind and the weight of climbing plants.
- Re-tighten any loose connections to maintain stability.
By following these maintenance tips, you can enjoy a sturdy and attractive wooden trellis that enhances your garden and supports your climbing plants effectively. Regular attention to these details not only prolongs the life of your trellis but also markedly enhances the aesthetics of your garden space.

Common Mistakes to Avoid
When installing a wooden garden trellis, avoiding common mistakes can save you time, effort, and money. Here are key pitfalls to watch for:
- Neglecting Site Selection: Choosing the wrong location can hinder your trellis’s effectiveness. Ensure the spot provides enough sunlight and space for the intended plants to flourish. Avoid areas with heavy foot traffic or where the trellis might block views.
- Incorrect Depth of Holes: For larger trellises, make sure to dig holes 16-20 inches deep. Installing the posts too shallow can cause instability. It’s often advised to sink legs at least 12 inches into the ground for lighter plants, and 24 inches for heavier plants.
- Insufficient Support: Failing to secure your trellis with concrete may lead to shifting or collapse under the weight of climbing plants. A sturdy installation involves digging holes and placing concrete around the base for maximum stability.
- Ignoring Maintenance Needs: Wood can deteriorate over time if not treated properly. Use suitable preservatives and treatments to ensure the longevity of your wooden trellis. Regular maintenance will keep it looking great for years.
- Overcrowding Plants: Be mindful of the plants you choose for your trellis. Ensure there’s enough space between the trellis and surrounding structures, preventing plant suffocation and allowing for healthy growth.
Checklist for Successful Installation
|
Step |
Common Mistake |
Solution |
|
Choose Location |
Blocked light or views |
Select a spacious, well-lit site |
|
Dig Holes |
Shallow depth |
Dig 16-20 inches for larger trellises |
|
Use Concrete |
Insecure installation |
Secure trellis with concrete around the base |
|
Consider Plant Needs |
Overcrowded plants |
Ensure ample gap for climbing room |
|
Maintain Wood Trellis |
Ignoring upkeep |
Treat wood regularly with appropriate chemicals |
Following these guidelines will help you avoid mistakes and ensure a successful installation. With the right approach, your wooden garden trellis can enhance the beauty of your outdoor space while supporting your favorite plants. For quality wooden fencing options and materials for your trellis project, check out Pickets wooden fences.

FAQ
What are the benefits of using a wooden garden trellis?
A wooden garden trellis offers versatility, supports vertical gardening, improves air circulation, adds aesthetic appeal, provides privacy screens, supports various plants, acts as windbreaks, and helps organize plant growth.
What types of wooden garden trellises are available?
There are several types, including classic lattice trellises, A-frame trellises, panel trellises, trellis arches, flat vertical trellises, and trellis obelisks.
What materials are best for building a wooden garden trellis?
Rot-resistant woods like cedar and redwood are ideal for building a durable wooden garden trellis.
What tools and materials are needed to build a wooden garden trellis?
You will need a saw, drill, screwdriver, wood screws, wood glue, clamps, tape measure, pencil, safety goggles, work gloves, and optionally, concrete and gravel for added stability.
How do I choose the right location for my trellis?
Select a spot that aligns with the trellis’s purpose, allows for good air circulation, and receives adequate sunlight. Avoid areas with heavy foot traffic or where the trellis might block views.
How deep should I dig holes for my trellis posts?
For lighter plants, holes should be at least 12 inches deep. For heavier plants, dig holes 16-20 inches deep, and consider securing the base with concrete.
How can I maintain my wooden garden trellis?
Regularly inspect for loose screws, rot, or weak sections. Apply wood preservatives, trim climbing plants, clean debris, and ensure the trellis remains firmly anchored.
What are common mistakes to avoid when installing a wooden garden trellis?
Avoid poor site selection, shallow hole digging, insufficient support, neglecting maintenance, and overcrowding plants.
Can I customize my wooden garden trellis?
Yes, you can paint or stain your trellis to match your garden’s theme and add decorative elements like hanging plants or sculptures for enhanced visual appeal.
Why is it important to leave a gap between the trellis and the wall?
A gap ensures good air circulation around the plants, promoting healthy growth and preventing plant suffocation.