
To set fence posts properly, choose durable materials like pressure-treated wood or naturally rot-resistant wood. Dig holes that are one-third the length of the posts, use gravel for drainage, and ensure posts are vertical before filling with soil or concrete.
Planning Post Installation
Before you begin installing your new fence, preparing thoroughly is essential. A well-laid plan will simplify the process and help avoid potential setbacks or legal issues. Here’s a step-by-step guide designed to streamline your pre-installation planning and ensure a smooth start to putting up your fence.
Understand Local Regulations
Verify local building codes and community standards to ensure compliance with height, design, and boundary regulations. Some areas require a permit for fence installation, which you can usually obtain through your local city council or homeowner’s association. This proactive check prevents potential fines and the hassle of reworking your fence later.
Survey Your Property
Confirming your property lines is crucial before you dig. Hiring a surveyor can provide the most accurate boundary lines, helping prevent disputes with neighbors over encroachments. During this step, plan for any sloped areas by deciding whether to step or slope the fence for maximum stability and aesthetics.
Safety Measures and Utilities
Contact local utility companies to mark the location of underground utilities for safety. Striking a utility line can lead to serious injuries and disrupt service in the neighborhood. This call ensures that your post locations are safe for digging.
Clear and Prep the Fence Line
Remove any obstacles like rocks, bushes, or debris where your fence will be. Discussing plans with neighbors is beneficial, especially if the fence will be near their property. Clear communication can lead to cooperative solutions and a smoother process.
Materials and Tools
Decide on the type of fence that best suits your needs. If you’re looking for a traditional, sturdy option, wooden fences like those offered by Greenes might suit your aesthetic and functional needs. Gathering all your materials and tools before starting will save time and frustration during the installation process.
Layout and Measurements
Measure the perimeter of where the fence will be to determine how much material you will need. Mark where the posts will be placed, typically every 6–8 feet, using stakes and string for accuracy. This preliminary setup lends itself to an even and aesthetically pleasing fence line.
Preparation for Dirt and Debris
Plan for the disposal or repurposing of the soil that will be displaced from digging post holes. Whether you use it in other garden projects or need to arrange for removal, thinking ahead simplifies the process.
By following these steps, you’re setting the stage for successful fence installation that meets your needs—functionality, compliance, and aesthetics. Meticulous preparation can transform a complex project into a manageable, satisfying task.

Selecting the Right Materials
Choosing the right materials for setting fence posts is about more than aesthetic preferences; it’s a strategic decision that impacts the longevity and sturdiness of your fencing. A variety of wood types and treatments are available, each suited to different environments and needs.
Pressure-Treated Wood: One of the most reliable choices for fence posts is pressure-treated wood. Treated to resist decay and pests, Southern yellow pine stands out for its durability and cost-effectiveness. Treated under high pressure, this wood type provides a shield against rot for about five to ten years without additional treatments. This wood suits areas exposed to moisture or prone to insect issues.
Natural Resistance: Some wood varieties offer natural resistance to rot and decay without the need for chemical treatments. Black locust, for example, boasts a longevity of up to 100 years and features innate properties that fend off rot. Similarly, Osage orange can significantly outlast most wood types, serving effectively for centuries due to its densely packed fibers and natural chemicals.
For those seeking traditional methods to enhance wood durability at a lower cost, the Tennessee method, or lightly charring the wood, can significantly diminish the susceptibility of wood to moisture and fungal attacks. This method coats the surface with a protective layer, thereby elongating the lifespan of the posts.
Installation Advancements: When installing these posts, considering how they interact with ground moisture is key. Techniques such as setting the posts in gravel, ensuring proper drainage and moisture barriers, and even the use of plastic post protectors to ward off soil contact, can drastically prolong your fence’s life.
Alongside natural options, hybrid approaches can be taken. For instance, combining cedar for fence panels with pressure-treated pine for the posts marries aesthetic appeal with structural durability. Ensuring the wood has been properly treated and inspected before purchase shields your fence from premature weakening due to moisture infiltration.
For those interested in DIY methods, applying a moisture-resistant preservative to the base and any cut ends during installation protects it effectively against the elements.
When selecting wood for fence posts, consider not only the wood type but the preventive treatments and installation methods. These factors dictate the robustness, appearance, and longevity of your fence, ensuring it stands proud and functional for years.
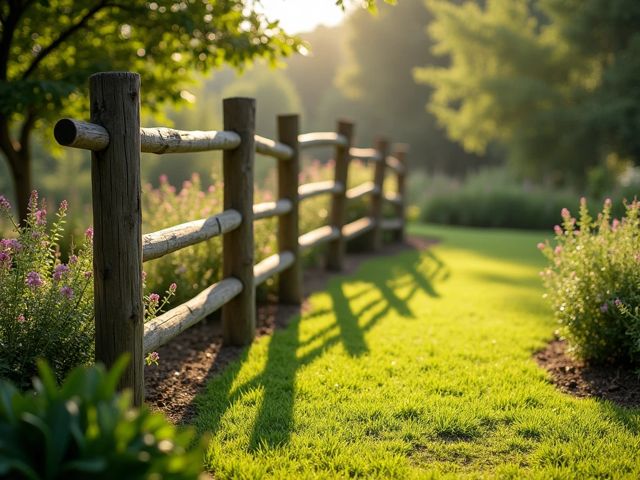
Proper Techniques for Setting Posts in Soil
Setting fence posts correctly in soil is a foundational step in building a durable and stable fence. Here’s a guide on how to achieve this with precision:
Start by selecting the right type of posts for your fence, as the strength and longevity of your fence depend heavily on the quality of the posts. Choose materials that resist rot and moisture, such as cedar, redwood, or black locust. For an economical choice, pressure-treated wood posts are effective due to their resistance to decay and pests.
Before installation, treat the ends of the posts. Cutting the top of each post at a 45-degree angle helps water runoff, reducing the risk of moisture accumulation. Protecting the wood by applying a brush-on wood preservative to both ends will guard against moisture, which can be detrimental over time.
The next step involves accurate digging of the post holes. The depth should ideally be one-third the length of the post for sufficient anchor and stability. For improved drainage—critical to maintaining the integrity of the post—lay a 2–3 inch layer of gravel at the hole’s bottom.
When setting the post, ensure it’s perfectly vertical by using a spirit level and stabilize it with wooden stakes and strong wire or string for temporary support. As you fill the hole with soil or gravel, compact the material around the post after every few inches to prevent air pockets and loose areas that might reduce stability.
For added durability, especially in softer or moist soils, setting the posts in concrete provides a much stronger foundation. After digging the hole wider and deeper—at least 12 inches in diameter and a third of the post’s length—add a gravel base followed by the concrete mix. Ensure you slope the concrete away from the post at the base to avoid water pooling, which can lead to wood rot.
After the initial setup, building a small hill of soil around the base of each post will help with water drainage, preventing soil from sitting against the post and causing potential damage.
Using these steps, you can securely set your fence posts in soil, ensuring that your fence remains robust and upright for years. Pairing good construction techniques with high-quality materials, like those from Greenes Picket Fence, makes all the difference in creating a stable and long-lasting fence.

Installing Posts with Concrete for Stability
When seeking to install fence posts with a focus on stability, using concrete offers a distinct advantage, especially in windy or heavily used environments. The process is straightforward but requires attention to detail to prevent future problems.
Start by preparing the site correctly:
- Establish a clear layout by placing stakes at the corner points of your planned fence line and connecting them with a string line for alignment. Mark the exact locations for your posts, spacing them appropriately according to your chosen fencing material.
Digging the right kind of holes is your next step:
- The depth of each hole should be one-fourth to one-third of the length of the post to provide ample anchoring. Using an auger or post-hole digger makes this task easier and more precise.
Setting the posts requires precision and patience:
- Place your post in the prepared hole and add six inches of gravel at the base for necessary drainage. Proceed to fill the hole with fast-setting concrete up to a few inches below ground level to allow for coverage later. During this process, it’s vital to ensure the post remains upright and aligned with your string line. Fast-setting concrete is ideal as it allows for quicker stabilization of the post, reducing the time needed for manual support.
Allow adequate curing time:
- After pouring the concrete, let it set and cure completely, generally taking three to four days. This is crucial for providing the durability and rigidity your fence needs to withstand elements and pressure.
For additional protection and longevity of your fence, consider applying a sealant or protective coating once the concrete has dried. This helps guard against moisture and other environmental factors that can lead to deterioration over time.
The success of your installation heavily depends on the quality of materials used. Opt for high-quality wood posts such as those offered by Greenes Picket Fence, known for their durability and aesthetic appeal.
By following these carefully outlined steps, you secure a stable and enduring boundary that maintains its integrity and function over the years. Such thorough installation efforts ensure your fence stands firm, providing safety and clearly defining your property.

FAQ
What are the essential steps to plan for fence post installation?
Preparing for fence post installation involves understanding local regulations, surveying property lines, ensuring safety by marking underground utilities, clearing the fence line, selecting appropriate materials and tools, measuring for layout, and planning for soil disposal during the installation process.
Why is it important to verify local regulations before installing a fence?
Verifying local building codes and community standards ensures compliance with height, design, and boundary placement regulations. This proactive check can prevent potential fines and the need for alterations later.
How can I confirm my property lines before installing a fence?
Hiring a surveyor to establish accurate property boundaries is an effective way to confirm your property lines, helping avoid disputes with neighbors regarding encroachments and ensuring your fence is installed correctly.
What safety measures should I take before digging post holes?
Contact local utility companies to mark the locations of underground utilities to prevent accidents; striking a utility line can cause serious injuries and service disruptions in the area.
What types of wood are best for fence posts?
Pressure-treated wood is a reliable choice due to its decay resistance, with Southern yellow pine being popular. Naturally rot-resistant woods like black locust and Osage orange can offer longevity without chemical treatments.
What technique can I use to protect fence posts from moisture?
Cutting the top of the post at a 45-degree angle allows water runoff, and applying a brush-on wood preservative to the ends provides an extra layer of protection against moisture.
How deep should I dig post holes for fence installation?
Post holes should ideally be dug to a depth of one-third the length of the post. This ensures proper anchoring and stability for the fence.
What is the role of gravel when setting fence posts?
Adding a layer of gravel at the bottom of the hole helps with drainage, preventing water accumulation that can compromise the integrity of the post over time.
Should I use concrete for setting fence posts, and why?
Using concrete provides enhanced stability, especially in areas exposed to wind or heavy use, anchoring the posts securely and helping prevent movement over time.
How long does it take for concrete to cure after setting fence posts?
Concrete typically requires three to four days to cure completely, which is essential for achieving the desired durability and rigidity for the fence.